
Protect Kubernetes Webapps with Azure Active Directory(AAD) Authentication by Using oauth2_proxy

Adding authentication to webapps sometimes is a challenging task, requires knowledge and coding for user registration, login and authentication. Specially if you are a kubernetes cluster admin, you need to take extremely care of publishing your website/web service to internet since any malicious users can access the frontend and potentially gain backend access, this article will present a simple and easy approach for kubernetes admin to protect internet facing webapps without any extra developments by using oauth2_proxy.
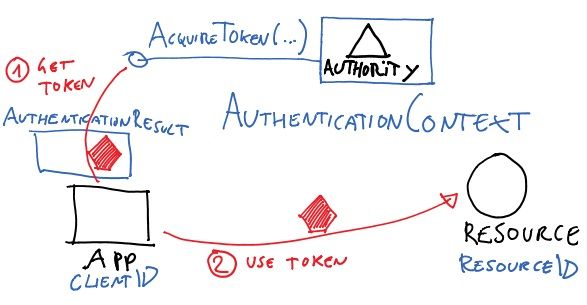
oauth2_proxy is
A reverse proxy and static file server that provides authentication using Providers (Google, GitHub, and others) to validate accounts by email, domain or group.
Although Microsoft Azure Active Directory(AAD) is used here for authentication, it also applies to other authentication providers like google, github, facebook and linkedin, just requires a small piece of configuration change.
To achieve AAD authentication goal, it requires an AAD directory as well as below applications in kubernetes
We will presume a kubernetes cluster is setup already, as well as ingress-nginx and cert-manager. For ingress-nginx and cert-manager setup, please refer to How do I host this website in Azure K8S cluster
Here is the step by step guide
1 Register an application in AAD
- Sign in to your Azure portal.
- Click "Azure Active Directory" from the left navigation area.
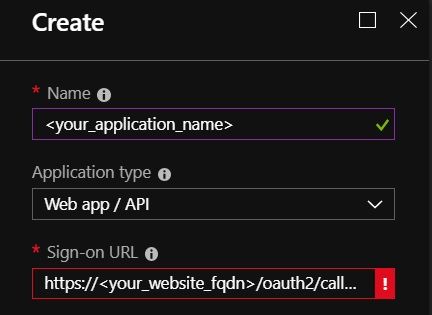
- From right panel displayed, click on "App registrations" and click "New application registration"
- Fill required information, specially for Sign-on URL, the URL must be https://your_website_fqdn/oauth2/callback, otherwise it won't work, this is because during authentication oauth2_proxy will send this callback information to AAD and AAD will verify if the sign-on URL matches it. Click "Create" to create the application.
- Find the newly created AAD application, click it and click "Settings"->"Keys", create a new key and record its value.
- Record Application ID and Directory ID, Application ID can be found from AAD application view blade, and Directory ID can be found from Azure Active Directory->Property page.
2 Deploy oauth2_proxy to kubernetes
To use oauth2_proxy in kubernetes, we need to deploy it to kubernetes cluster. Create a yaml file called oauth2_proxy.yaml, copy/paste below content into oauth2_proxy.yaml, replace <value> with those values from step 1.
# oauth2_proxy.yaml
apiVersion: extensions/v1beta1
kind: Deployment
metadata:
  name: oauth2-proxy
  namespace: <REPLACE_WITH_YOUR_NAMESPACE>
spec:
  replicas: 1
  selector:
    matchLabels:
      app: oauth2-proxy
  template:
    metadata:
      labels:
        app: oauth2-proxy
    spec:
      containers:
      - env:
          - name: OAUTH2_PROXY_PROVIDER
            value: azure
          - name: OAUTH2_PROXY_AZURE_TENANT
            value: <REPLACE_WITH_DIRECTORY_ID>
          - name: OAUTH2_PROXY_CLIENT_ID
            value: <REPLACE_WITH_APPLICATION_ID>
          - name: OAUTH2_PROXY_CLIENT_SECRET
            value: <REPLACE_WITH_SECRET_KEY>
          - name: OAUTH2_PROXY_COOKIE_SECRET
            value: <REPLACE_WITH_VALUE_OF python -c 'import os,base64; print base64.b64encode(os.urandom(16))'>
          - name: OAUTH2_PROXY_HTTP_ADDRESS
            value: "0.0.0.0:4180"
          - name: OAUTH2_PROXY_UPSTREAM
            value: "http://<REALCE_WITH_WEBAPPS_SVC_ADDRESS>"
        image: machinedata/oauth2_proxy:latest
        imagePullPolicy: IfNotPresent
        name: oauth2-proxy
        ports:
        - containerPort: 4180
          protocol: TCP
---
apiVersion: v1
kind: Service
metadata:
  labels:
    k8s-app: oauth2-proxy
  name: oauth2-proxy
  namespace: <REPLACE_WITH_YOUR_NAMESPACE>
spec:
  ports:
  - name: http
    port: 4180
    protocol: TCP
    targetPort: 4180
  selector:
    app: oauth2-proxy
From bash/command prompt, run kubectl apply -f oauth2-proxy.yaml to deploy oauth2_proxy application. The docker image used here is machinedata/oauth2_proxy which is only 21.4MB and yet provide a lot of configuration parameters, for configuration details, for example support google, facebook and linkedin authentication, please refer to this article.
3 Publish webapps
To publish webapps and protect it by AAD authentication, it requires two ingresses, one for webapps itself, another for oauth_proxy authentication, here are the sample configurations
# ingress.yaml
apiVersion: extensions/v1beta1
kind: Ingress
metadata:
  name: <YOUR_WEBAPPS>-ingress
  namespace: <REPLACE_WITH_YOUR_NAMESPACE>
  annotations:
    kubernetes.io/ingress.class: "nginx"
    kubernetes.io/tls-acme: "true"
    nginx.ingress.kubernetes.io/auth-url: "https://$host/oauth2/auth"
    nginx.ingress.kubernetes.io/auth-signin: "https://$host/oauth2/start?rd=$escaped_request_uri"
spec:
  rules:
    - host: <REPLACE_WITH_YOUR_WEBAPPS_FQDN>
      http:
        paths:
          - path: /
            backend:
              serviceName: gateway
              servicePort: <REPLACE_WITH_WEBAPPS_PORT>
  tls:
  - hosts:
    - <REPLACE_WITH_YOUR_WEBAPPS_FQDN>
    secretName: <YOUR_WEBAPPS>-tls
---
apiVersion: extensions/v1beta1
kind: Ingress
metadata:
  name: oauth2-proxy
  namespace: <REPLACE_WITH_YOUR_NAMESPACE>
  annotations:
    kubernetes.io/ingress.class: "nginx"
spec:
  rules:
    - host: <REPLACE_WITH_YOUR_WEBAPPS_FQDN>
      http:
        paths:
          - path: /oauth2
            backend:
              serviceName: oauth2-proxy
              servicePort: 4180
  tls:
  - hosts:
    - <REPLACE_WITH_YOUR_WEBAPPS_FQDN>
    secretName: <YOUR_WEBAPPS>-tls
Run kubectl apply -f ingress.yaml to publish website/service to internet. Now, if user visit the webapps, it will rediret user to AAD authentiation page,
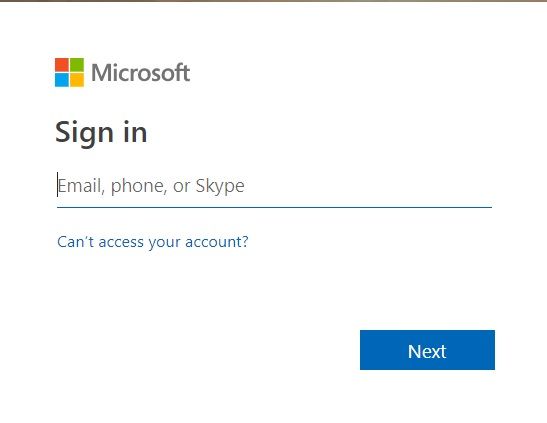
If user has permission to access webapps, after inputting username/password, user should be redirected to webapps page, otherwise a sign-in error will pop up

4 Under the hood
What happens from backend is
- When user access https://<YOUR_WEBAPPS>, As
nginx.ingress.kubernetes.io/auth-urlis configured in nginx, nginx will check if the user is already authenticated, if not, nginx will redirect this request to the URLhttps://$host/oauth2/start?rd=$escaped_request_uriin our case is https://<YOUR_WEBAPPS>/oauth2/start?rd=$<YOUR_WEBAPPS> - As /oauth2 is mapped to oauth2_proxy service, so oauth2_proxy will receive this request and it will send an authentication request to AAD and redirect you to AAD authentication login page
- If the authentication is successed and the user is allowed to access the application, oauth2_proxy will redirect user to web page. Other it will just show the error.
- Further HTTP requests will pass to
nginx.ingress.kubernetes.io/auth-url, as it is already authenticated, so user will access web pages directly no need to authenticate again.