
How do I host this website in Azure K8S cluster
Explain how I built up my website from Azure hosted K8S cluster


0 Background
This website is hosted in a kubernetes cluster with 3 Azure B2S VMs. In the following sections, I am going to explain how I build up the whole cluster, how to leverage kubernetes to provide the infrastructure support, aks-engine, helm, cert-manager and nginx-ingress controller will be discussed here.
1 Setup a K8S cluster with AKS-Engine
Recently, Microsoft started a new project called AKS-Engine to replace its old project ACS-Engine. Basically AKS-Engine is the successor of ACS-Engine, Microsoft migrated all ACS-Engine code to AKS-Engine and provide updated support for new K8S deployment. So I decide to use AKS-Engine to deployment my K8S cluster.
The latest AKS-Engine can be downloaded from Here. Download and extract aks-engine so we can use it to create a K8S cluster. The completed deploy guide can be found from this link
1.1 Define a template
To create a cluster, we need a template file which will be used in aks-engine command line, I'd like to try the newest K8S release, so I set orchestratorRelease to 1.13.1, by default, aks-engine will use Azure advanced networking as network plugin. Here is my template k8s113.json
{
  "apiVersion": "vlabs",
  "properties": {
    "orchestratorProfile": {
      "orchestratorType": "Kubernetes",
      "orchestratorRelease": "1.13.1"
    },
    "masterProfile": {
      "count": 1,
      "dnsPrefix": "<REPLACE_WITH_A_DNS_PREFIX>",
      "vmSize": "Standard_B2s"
    },
    "agentPoolProfiles": [
      {
        "name": "agentpool1",
        "count": 2,
        "vmSize": "Standard_B2s",
        "availabilityProfile": "AvailabilitySet"
      }
    ],
    "linuxProfile": {
      "adminUsername": "<REPLACE_WITH_ADMIN_USER_NAME>",
      "ssh": {
        "publicKeys": [
          {
            "keyData": "<SSH_PUBLIC_KEY_DATA>"
          }
        ]
      }
    },
    "servicePrincipalProfile": {
      "clientId": "<appId>",
      "secret": "<password>"
    }
  }
}
Note: clientID and secret maps to a service principal's appId and password, if you don't have service principal yet, you can create it by using below commands
az login
az account set --subscription="${SUBSCRIPTION_ID}"
az ad sp create-for-rbac --role="Contributor" --scopes="/subscriptions/${SUBSCRIPTION_ID}"
1.2 Deploy K8S cluster
Using aks-engine to deploy a K8S cluster is pretty simple, just run below command
aks-engine deploy --resource-group "AKSEngine" --location "<ANY_LOCATION>" --subscription-id "<AZURE_SUBSCRIPTION_ID>" --api-model "k8s113.json"
Note: you can use az account list-locations to get a completed list of locations
2 Deploy website
This website is based on ghost, the professional publishing platform. To publish this website to internet, we also need a public IP address as well as a SSL certificate. So I am going to deploy&use below applications in K8S cluster.
- cert-manager (to request a SSL certificate)
- nginx-ingress controller (expose website to internet)
- kubeapps (web based helm UI)
- ghost (my website)
In K8S world, helm can help manage kubernetes application, and there are plenty charts available, so I am going to use helm to deploy those applications.
Helm can be downloaded and installed from here. Helm comes with two components, client tool helm and K8S server component Tiller, by default, aks-engine already has tiller deployed in kube-system namespace. However, to avoid error message like "incompatible versions client[v2.x.x] server[v2.x.x]", it's always a good practise to run helm init --upgrade to upgrade server component.
2.1 Deploy cert-manager
We are going to use cert-manager application with letsencrypt to request a free SSL certificate for our website, install cert-manager is very simple in helm, just run
helm install stable/cert-manager --name arracs-cert-manager --namespace kube-system --set ingressShim.defaultIssuerName=letsencrypt-prod --set ingressShim.defaultIssuerKind=ClusterIssuer
Note: cert-manager can be configured to automatically provision TLS certificates for Ingress resources via annotations on your Ingresses, refer to here, this feature is enabled by default since cert-manager v0.2.2.
If you would also like to use the old kube-lego kubernetes.io/tls-acme: "true" annotation for fully automated TLS, you will need to configure a default Issuer when deploying cert-manager. This can be done by adding the following --set when deploying using Helm:
--set ingressShim.defaultIssuerName=letsencrypt-prod
--set ingressShim.defaultIssuerKind=ClusterIssuer
Above command basically means, if an ingress object created, cert-manager will use letsencrypt-prod ClusterIssuer to automatically create a certificate for that Ingress object. And for all Ingress object with the kubernetes.io/tls-acme: "true" annotation, using the ClusterIssuer we have specified in "--set" to create the certificate.
As we use letsencrypt-prod ClusterIssuer, we also need to define it so that cert-manager can know where to request certificate, below letsencrypt-issuer.yaml defines two ClusterIssuer, one is for letsencrypt-prod(used in our production website), another is for letsencrypt-staging(used for testing purpose).
# letsencrypt-issuer.yaml
apiVersion: certmanager.k8s.io/v1alpha1
kind: Issuer
metadata:
  name: letsencrypt-prod
  namespace: kube-system
spec:
  acme:
    # Email address used for ACME registration
    email: huangyingting@outlook.com
    http01: {}
    # Name of a secret used to store the ACME account private key
    privateKeySecretRef:
      key: ""
      name: letsencrypt-prod
    server: https://acme-v01.api.letsencrypt.org/directory
---
apiVersion: certmanager.k8s.io/v1alpha1
kind: Issuer
metadata:
  name: letsencrypt-staging
  namespace: kube-system
spec:
  acme:
    server: https://acme-staging.api.letsencrypt.org/directory
    # Email address used for ACME registration
    email: huangyingting@outlook.com
    # Name of a secret used to store the ACME account private key
    privateKeySecretRef:
      name: letsencrypt-staging
    http01: {}
Run below command to apply letsencrypt-issuer.yaml to K8S cluster
#kubectl apply -f letsencrypt-issuer.yaml
issuer.certmanager.k8s.io/letsencrypt-prod created
issuer.certmanager.k8s.io/letsencrypt-staging created
2.2 Deploy nginx-ingress controller
We need an ingress controller to expose our service to internet, we will use nginx-ingress, here is the command to install this ingress controller
helm install stable/nginx-ingress --name arracs-nginx-ingress --namespace kube-system --set controller.replicaCount=2
nginx-ingress controller will create a LoadBalancer with public IP, from output below, <pending> means cloud provider is still allocating the load balancer and the public IP address is not ready yet.
#kubectl get svc --all-namespaces
NAMESPACE     NAME                                   TYPE           CLUSTER-IP     EXTERNAL-IP   PORT(S)                      AGE
default       kubernetes                             ClusterIP      10.0.0.1       <none>        443/TCP                      20m
kube-system   arracs-nginx-ingress-controller        LoadBalancer   10.0.130.113   <pending>     80:31726/TCP,443:32222/TCP   2m
kube-system   arracs-nginx-ingress-default-backend   ClusterIP      10.0.88.109    <none>        80/TCP                       2m
kube-system   heapster                               ClusterIP      10.0.78.216    <none>        80/TCP                       20m
kube-system   kube-dns                               ClusterIP      10.0.0.10      <none>        53/UDP,53/TCP                20m
kube-system   kubernetes-dashboard                   NodePort       10.0.121.103   <none>        443:30909/TCP                20m
kube-system   metrics-server                         ClusterIP      10.0.117.153   <none>        443/TCP                      20m
kube-system   tiller-deploy                          ClusterIP      10.0.217.230   <none>        44134/TCP                    20m
2.3 Deploy kubeapps
Kubeapps is a web-based UI for deploying and managing applications in Kubernetes clusters. To experience web based deployment, I installed kubeapps with below steps
2.3.1 Add bitnami helm charts repo
helm repo add bitnami https://charts.bitnami.com/bitnami
"bitnami" has been added to your repositories
2.3.2 Install kubeapps
helm install --name kubeapps --namespace kubeapps bitnami/kubeapps
2.3.3 Create token to access kubeapps
kubectl create serviceaccount kubeapps-operator
serviceaccount/kubeapps-operator created
kubectl create clusterrolebinding kubeapps-operator --clusterrole=cluster-admin --serviceaccount=default:kubeapps-operator
clusterrolebinding.rbac.authorization.k8s.io/kubeapps-operator created
2.3.4 Access kubeapps
The default deployment didn't create LoadBalancer/Ingress, so I used kubectl port-forward to access kubeapps' dashboard
kubeapps-internal-dashboard is the service we are going to access
kubectl get svc -n=kubeapps
NAME                             TYPE        CLUSTER-IP     EXTERNAL-IP   PORT(S)     AGE
kubeapps                         ClusterIP   10.0.3.152     <none>        80/TCP      22h
kubeapps-internal-chartsvc       ClusterIP   10.0.77.63     <none>        8080/TCP    22h
kubeapps-internal-dashboard      ClusterIP   10.0.9.135     <none>        8080/TCP    22h
kubeapps-internal-tiller-proxy   ClusterIP   10.0.95.205    <none>        8080/TCP    22h
kubeapps-mongodb                 ClusterIP   10.0.170.238   <none>        27017/TCP   22h
Running below commands will create a port forwarding to kubeapps dashboard, accessing localhost:8080 will redirect to kubeapps-internal-dashboard
kubectl port-forward -n kubeapps svc/kubeapps-internal-dashboard 8080:8080
Forwarding from 127.0.0.1:8080 -> 8080
Forwarding from [::1]:8080 -> 8080
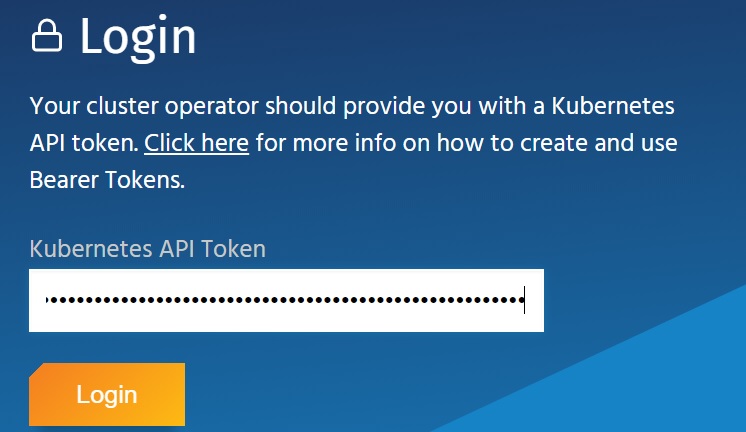
Now, we can access kubeapps from a browser by visiting http://127.0.0.1:8080 but we still need an API token to login, use below command to reterive the API token which is created in step 2.3.3
kubectl get secret $(kubectl get serviceaccount kubeapps-operator -o jsonpath='{.secrets[].name}') -o jsonpath='{.data.token}' | base64 --decode
2.4 Deploy ghost
From command window, run
kubectl create namespace ghost
to create a namespace "ghost" in order to deploy all ghost related applications into it.
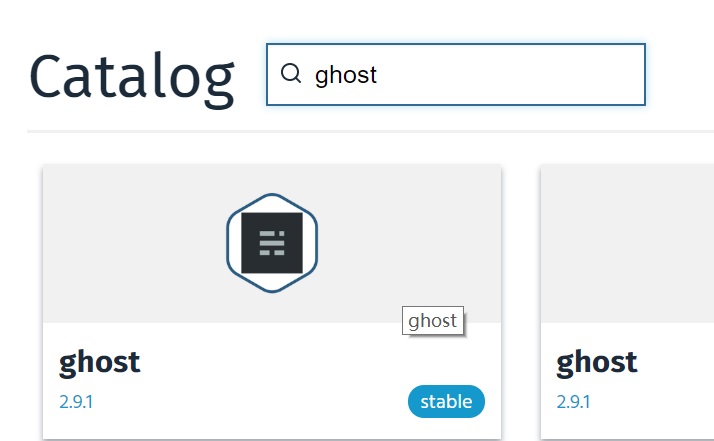
After logging into kubeapps web console, choose NAMESPACE to "ghost", then from "Catalog" tab, search ghost, click stable version
Then click "Deploy using Helm", from the deployment page, name the deployment and values to below, then click "Submit" to deploy
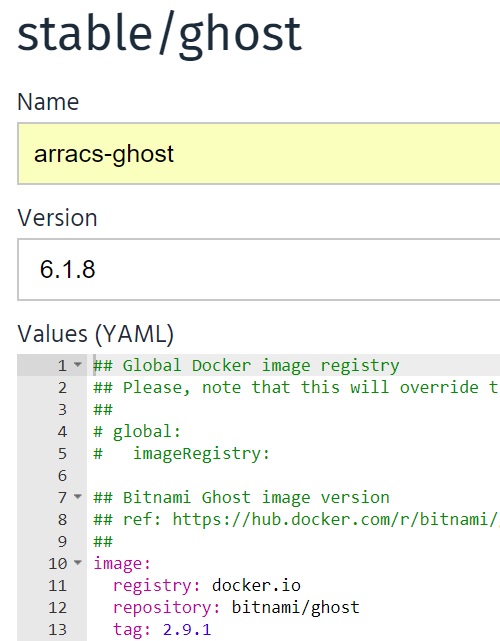
## Bitnami Ghost image version
## ref: https://hub.docker.com/r/bitnami/ghost/tags/
##
image:
  registry: docker.io
  repository: bitnami/ghost
  tag: 2.9.1
  ## Specify a imagePullPolicy
  ## Defaults to 'Always' if image tag is 'latest', else set to 'IfNotPresent'
  ## ref: http://kubernetes.io/docs/user-guide/images/#pre-pulling-images
  ##
  pullPolicy: IfNotPresent
  ## Optionally specify an array of imagePullSecrets.
  ## Secrets must be manually created in the namespace.
  ## ref: https://kubernetes.io/docs/tasks/configure-pod-container/pull-image-private-registry/
  ##
  # pullSecrets:
  #   - myRegistrKeySecretName

##
## Init containers parameters:
## volumePermissions: Change the owner of the persist volume mountpoint to RunAsUser:fsGroup
##
volumePermissions:
  image:
    registry: docker.io
    repository: bitnami/minideb
    tag: latest
    pullPolicy: Always

## Ghost host and path to create application URLs
## ref: https://github.com/bitnami/bitnami-docker-ghost#configuration
##
ghostHost: msazure.club
ghostPath: /

## User of the application
## ref: https://github.com/bitnami/bitnami-docker-ghost#configuration
##
ghostUsername: <REPLACE_WITH_USERNAME>

## Application password
## Defaults to a random 10-character alphanumeric string if not set
## ref: https://github.com/bitnami/bitnami-docker-ghost#configuration
##
ghostPassword: <REPLACE_WITH_PASSWORD>

## Admin email
## ref: https://github.com/bitnami/bitnami-docker-ghost#configuration
##
ghostEmail: <REPLACE_WITH_ADMIN_EMAIL>

## Ghost Blog name
## ref: https://github.com/bitnami/bitnami-docker-ghost#environment-variables
##
ghostBlogTitle: msazure

## Set to `yes` to allow the container to be started with blank passwords
## ref: https://github.com/bitnami/bitnami-docker-wordpress#environment-variables
allowEmptyPassword: "yes"

## SMTP mail delivery configuration, don't leave it empty, otherwise the deployment will fail.
## ref: https://github.com/bitnami/bitnami-docker-redmine/#smtp-configuration
##
smtpHost: <REPLACE_WITH_SMTP_SERVER>
smtpPort: <REPLACE_WIHT_SMTP_PORT>
smtpUser: <REPLACE_WITH_SMTP_USER>
smtpPassword: <REPLACE_WITH_SMTP_PASSWORD>
smtpService: <REPLACE_WITH_STMP_SERVICE>

##
## MariaDB chart configuration
##
## https://github.com/helm/charts/blob/master/stable/mariadb/values.yaml
##
mariadb:
  ## Whether to deploy a mariadb server to satisfy the applications database requirements. To use an external database set this to false and configure the externalDatabase parameters
  enabled: true
  ## Disable MariaDB replication
  replication:
    enabled: false

  ## Create a database and a database user
  ## ref: https://github.com/bitnami/bitnami-docker-mariadb/blob/master/README.md#creating-a-database-user-on-first-run
  ##
  db:
    name: db_ghost
    user: usr_ghost
    ## If the password is not specified, mariadb will generates a random password
    ##
    password: <REPLACE_WITH_PASWORD>

  ## MariaDB admin password
  ## ref: https://github.com/bitnami/bitnami-docker-mariadb/blob/master/README.md#setting-the-root-password-on-first-run
  ##
  rootUser:
    password: <REPLACE_WIHT_PASSWORD>

  ## Enable persistence using Persistent Volume Claims
  ## ref: http://kubernetes.io/docs/user-guide/persistent-volumes/
  ##
  master:
    persistence:
      enabled: true
      ## mariadb data Persistent Volume Storage Class
      ## If defined, storageClassName: <storageClass>
      ## If set to "-", storageClassName: "", which disables dynamic provisioning
      ## If undefined (the default) or set to null, no storageClassName spec is
      ##   set, choosing the default provisioner.  (gp2 on AWS, standard on
      ##   GKE, AWS & OpenStack)
      ##
      # storageClass: "-"
      accessMode: ReadWriteOnce
      size: 8Gi

## As ingress will be used in below, so just use ClusterIP for service
##
service:
  type: ClusterIP
  # HTTP Port
  port: 80

## Pod Security Context
## ref: https://kubernetes.io/docs/tasks/configure-pod-container/security-context/
##
securityContext:
  enabled: true
  fsGroup: 1001
  runAsUser: 1001

## Enable persistence using Persistent Volume Claims
## ref: http://kubernetes.io/docs/user-guide/persistent-volumes/
##
persistence:
  enabled: true
  ## ghost data Persistent Volume Storage Class
  ## If defined, storageClassName: <storageClass>
  ## If set to "-", storageClassName: "", which disables dynamic provisioning
  ## If undefined (the default) or set to null, no storageClassName spec is
  ##   set, choosing the default provisioner.  (gp2 on AWS, standard on
  ##   GKE, AWS & OpenStack)
  ##
  # storageClass: "-"
  accessMode: ReadWriteOnce
  size: 8Gi
  path: /bitnami

## Configure resource requests and limits
## ref: http://kubernetes.io/docs/user-guide/compute-resources/
##
resources:
  requests:
    memory: 512Mi
    cpu: 300m

## Configure the ingress resource that allows you to access the
## Ghost installation. Set up the URL
## ref: http://kubernetes.io/docs/user-guide/ingress/
##
ingress:
  ## Set to true to enable ingress record generation
  enabled: true

  ## The list of hostnames to be covered with this ingress record.
  ## Most likely this will be just one host, but in the event more hosts are needed, this is an array
  hosts:
  - name: msazure.club

    ## Set this to true in order to enable TLS on the ingress record
    ## A side effect of this will be that the backend ghost service will be connected at port 443
    tls: true

    ## Set this to true in order to add the corresponding annotations for cert-manager
    certManager: true

    ## If TLS is set to true, you must declare what secret will store the key/certificate for TLS
    tlsSecret: msazure-club-tls

    ## Ingress annotations done as key:value pairs
    ## For a full list of possible ingress annotations, please see
    ## ref: https://github.com/kubernetes/ingress-nginx/blob/master/docs/annotations.md
    ##
    ## If tls is set to true, annotation ingress.kubernetes.io/secure-backends: "true" will automatically be set
    annotations:
      kubernetes.io/ingress.class: nginx
Some comments on above values, since ingress is used, it will trigger cert-manager to request a certificate from letsencrypt, the protocol being used is ACME, letsencrypt will verify if you own the domain, that means you must point DNS A record msazure.club to ingress controller's public IP, otherwise certificate request will get failed. For more details, please refer to How It Works - Let's Encrypt.
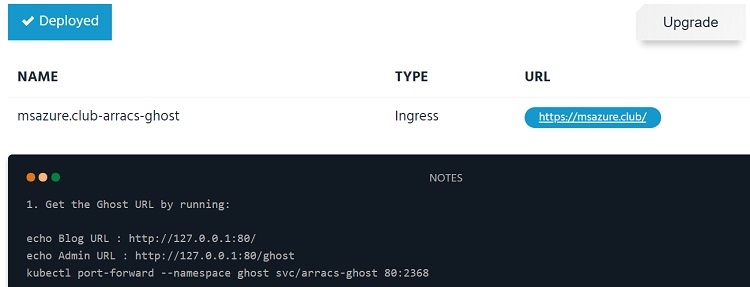
If the deployment goes well, kubeapps will eventually show "Deployed" like below
2.5 Visiting/tuning website
Once the deployment is finished, open a browser and access GHOST_URL/, it should render the website correctly.
As we use nginx-ingress controller, by default, it only allows uploading 1MB sized file, if the uploaded image size is exceed 1MB, ghost will report "The image you uploaded was larger than the maximum file size your server allows.". Luckly nginx ingress provide annotations to specific ingress objects to customize their behavior. We can use "nginx.ingress.kubernetes.io/proxy-body-size" annotation to control nginx behavior.
So I followed below steps modified ingress object
2.5.1 List ingress object
kubectl get ing -n=ghost
NAME                        HOSTS          ADDRESS   PORTS     AGE
msazure.club-arracs-ghost   msazure.club             80, 443   22h
2.5.2 Modify ingress object msazure.club-arracs-ghost
kubectl edit ing msazure.club-arracs-ghost -n=ghost
Modify its definition to
# Please edit the object below. Lines beginning with a '#' will be ignored,
# and an empty file will abort the edit. If an error occurs while saving this file will be
# reopened with the relevant failures.
#
apiVersion: extensions/v1beta1
kind: Ingress
metadata:
  annotations:
    kubernetes.io/ingress.class: nginx
    kubernetes.io/tls-acme: "true"
    nginx.ingress.kubernetes.io/proxy-body-size: 10m
  creationTimestamp: "2018-12-22T14:05:28Z"
...
When "nginx.ingress.kubernetes.io/proxy-body-size" annotation is added, the configuration change will be applied to nginx very soon, to verify it, we can run
kubectl get pod -n=kube-system | grep nginx-ingress-controller
arracs-nginx-ingress-controller-8b955dc4c-5mnsh        1/1       Running   0          10h
arracs-nginx-ingress-controller-8b955dc4c-ll5l8        1/1       Running   0          10h
kubectl exec -it -n=kube-system arracs-nginx-ingress-controller-8b955dc4c-5mnsh -- cat /etc/nginx/nginx.conf | grep client_max_body_size

			client_max_body_size                    10m;
			client_max_body_size                    10m;
2.6 Up and running
With above configuraitons, my website GHOST_URL/ should be up and running now :).
3 Upgrade K8S cluster
For some unknown reasons, the kubernetes cluster version is not at 1.13.1, `kubectl version' shows it is at version 1.10.12, I used below command upgraded my cluster to version 1.11.6, 1.12.4 till 1.13.1.
aks-engine upgrade --subscription-id "REPLACE_WIHT_SUBSCRIPTION_ID" --deployment-dir ./_output/arracs --location <REPLACE_WITH_LOCATION> --resource-group AKSEngine --upgrade-version 1.11.6 --auth-method client_secret --client-id <REPLACE_WITH_CLIENT_ID> --client-secret <REPLACE_WITH_CLIENT_SECRET>
Upgrading cluster from aks-engine basically works in below sequence
- Delete original master nodes and deploy new master nodes with upgraded version.
- Drain agent node one by one, delete agent node and deploy agent node with upgraded version.
- During upgrading, cluster public IP address remains.
The whole upgrading process basically won't interrupt the services running from cluster, although there will be a short downtime window when pods are migrated from one node to another node. For example, during the upgrading, I am still able to access my website https://msazure.club.
4 Explore K8S concepts
4.1 Access kubernetes dashboard
By default, the ServiceAccount used by the dashboard has not enough rights to access all resources. To solve the problem, we need to assign cluster-admin role to it, here is the command to do it
kubectl create clusterrolebinding kubernetes-dashboard -n kube-system --clusterrole=cluster-admin --serviceaccount=kube-system:kubernetes-dashboard
After that, use below command to redirect traffics to API server
kubectl proxy --port 8080
Then from browser, visit below URL, kubernetes dashboard should be able to access
http://localhost:8080/api/v1/namespaces/kube-system/services/https:kubernetes-dashboard:/proxy/
4.2 Services
There are 3 types of services, ClusterIP, NodePort and LoadBalancer. For example
kubectl get svc --all-namespaces
NAMESPACE     NAME                                   TYPE           CLUSTER-IP     EXTERNAL-IP     PORT(S)                      AGE
default       kubernetes                             ClusterIP      10.0.0.1       <none>          443/TCP                      2d23h
ghost         arracs-ghost                           ClusterIP      10.0.134.104   <none>          80/TCP                       7h4m
ghost         arracs-ghost-mariadb                   ClusterIP      10.0.35.211    <none>          3306/TCP                     7h4m
kube-system   arracs-nginx-ingress-controller        LoadBalancer   10.0.17.238    13.76.133.101   80:31289/TCP,443:31146/TCP   2d23h
kube-system   arracs-nginx-ingress-default-backend   ClusterIP      10.0.173.204   <none>          80/TCP                       2d23h
kube-system   heapster                               ClusterIP      10.0.16.142    <none>          80/TCP                       2d23h
kube-system   kube-dns                               ClusterIP      10.0.0.10      <none>          53/UDP,53/TCP                2d23h
kube-system   kubernetes-dashboard                   NodePort       10.0.100.128   <none>          443:31728/TCP                2d23h
kube-system   metrics-server                         ClusterIP      10.0.41.92     <none>          443/TCP                      2d23h
kube-system   tiller-deploy                          ClusterIP      10.0.202.135   <none>          44134/TCP                    2d23h
When access service, the traffic flow will be
- ClusterIP: <ClusterIP>:<Port> -> <Pod IP>:<Port IP>
- NodePort: <NodeIP>:<NodePort> -> <Pod IP>:<Port IP>
- LoadBalancer:<LBIP>:<LBPort> -> <Pod IP>:<Port IP>
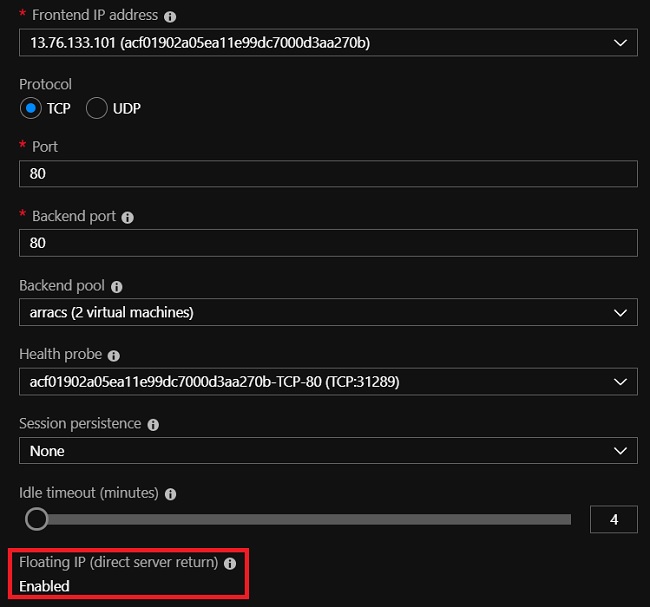
Specially, LoadBalancer exposes the service externally using a cloud provider’s load balancer. In Azure, if you check the setting of load balancer's public IP, you will see it is using "Floating IP", when "Floating IP" is enabled, Azure will directly send packet to agent node without modifying its SrcIP and DestIP.
Inbound traffics' destination IP(load balancer's public IP with floating IP enabled) will eventually DNAT to Pod's IP from agent node(not by Azure) by kubernetes, the purpose of using "Floating IP" is kubernetes needs destination IP address' information to associate it with corresponding service. Here is a sample for the iptables rules programmged for load balancer in my K8S cluster, 13.76.133.101 is load balancer's public IP address, the last rule is DNAT rule.
...
-A KUBE-SERVICES -d 13.76.133.101/32 -p tcp -m comment --comment "kube-system/arracs-nginx-ingress-controller:https loadbalancer IP" -m tcp --dport 443 -j KUBE-FW-JORQ6NA4OOQ53UTX
...
-A KUBE-SVC-JORQ6NA4OOQ53UTX -m statistic --mode random --probability 0.50000000000 -j KUBE-SEP-P3VRGVWU3CDZJRKA
-A KUBE-SVC-JORQ6NA4OOQ53UTX -j KUBE-SEP-R524ZW4QEMUCZWEH
...
-A KUBE-SEP-P3VRGVWU3CDZJRKA -p tcp -m tcp -j DNAT --to-destination 10.240.0.42:443
4.3 PersistentVolume(PV) and PersistentVolumeClaim(PVC)
The detailed explanation of PV and PVC, can be found from here.
Ghost helm charts will deploy 2 PVCs, one for MariaDB(DB to store ghost configuration) and one for ghost itself(store website data).
kubectl get pvc -n=ghost
NAME                          STATUS    VOLUME                                     CAPACITY   ACCESS MODES   STORAGECLASS   AGE
arracs-ghost                  Bound     pvc-a2d8532f-05f2-11e9-9dc7-000d3aa270bb   8Gi        RWO            default        1d
data-arracs-ghost-mariadb-0   Bound     pvc-a2ec9cbc-05f2-11e9-9dc7-000d3aa270bb   8Gi        RWO            default        1d
As this cluster uses Azure, K8S cloud provider will create two disks in azure

And the disks are programmed to attach to corresponding agent nodes where Pods claim to use them, for example, if we check agent VM from Azure portal, we can it has a data disk attached

To check who is using the PVC, we can run
kubectl describe pvc arracs-ghost -n=ghost
Name:          arracs-ghost
Namespace:     ghost
StorageClass:  default
Status:        Bound
Volume:        pvc-a2d8532f-05f2-11e9-9dc7-000d3aa270bb
Labels:        app=arracs-ghost
               chart=ghost-6.1.8
               heritage=Tiller
               release=arracs-ghost
Annotations:   pv.kubernetes.io/bind-completed: yes
               pv.kubernetes.io/bound-by-controller: yes
               volume.beta.kubernetes.io/storage-provisioner: kubernetes.io/azure-disk
Finalizers:    [kubernetes.io/pvc-protection]
Capacity:      8Gi
Access Modes:  RWO
Events:        <none>
Mounted By:    arracs-ghost-6d8c65c6db-h45x2
PVC is mounted by a Pod, it will persist to it, even the pod restarts the same configuration can be applied. For example, if we run kubectl delete pod arracs-ghost-6d8c65c6db-h45x2, newly created pod still will mount this PVC it.
If PVC is bound to a StatefulSet, even the whole StatefulSet is deleted, PVC still remains. In our case, data-arracs-ghost-mariadb-0 is bound to StatefulSet arracs-ghost-mariadb, so even I delete arracs-ghost-mariadb, PVC arracs-ghost-mariadb still remains.
kubectl describe StatefulSet arracs-ghost-mariadb -n=ghost
Name:               arracs-ghost-mariadb
Namespace:          ghost
CreationTimestamp:  Sat, 22 Dec 2018 22:05:28 +0800
Selector:           app=mariadb,component=master,release=arracs-ghost
Labels:             app=mariadb
                    chart=mariadb-5.2.5
                    component=master
                    heritage=Tiller
                    release=arracs-ghost
Annotations:        <none>
Replicas:           824638335384 desired | 1 total
Update Strategy:    RollingUpdate
Pods Status:        1 Running / 0 Waiting / 0 Succeeded / 0 Failed
Pod Template:
  Labels:  app=mariadb
           chart=mariadb-5.2.5
           component=master
           release=arracs-ghost
  Containers:
   mariadb:
    Image:      docker.io/bitnami/mariadb:10.1.37
    Port:       3306/TCP
    Host Port:  0/TCP
    Liveness:   exec [sh -c exec mysqladmin status -uroot -p$MARIADB_ROOT_PASSWORD] delay=120s timeout=1s period=10s #success=1 #failure=3
    Readiness:  exec [sh -c exec mysqladmin status -uroot -p$MARIADB_ROOT_PASSWORD] delay=30s timeout=1s period=10s #success=1 #failure=3
    Environment:
      MARIADB_ROOT_PASSWORD:  <set to the key 'mariadb-root-password' in secret 'arracs-ghost-mariadb'>  Optional: false
      MARIADB_USER:           usr_ghost
      MARIADB_PASSWORD:       <set to the key 'mariadb-password' in secret 'arracs-ghost-mariadb'>  Optional: false
      MARIADB_DATABASE:       db_ghost
    Mounts:
      /bitnami/mariadb from data (rw)
      /opt/bitnami/mariadb/conf/my.cnf from config (rw)
  Volumes:
   config:
    Type:      ConfigMap (a volume populated by a ConfigMap)
    Name:      arracs-ghost-mariadb
    Optional:  false
Volume Claims:
  Name:          data
  StorageClass:
  Labels:        app=mariadb
                 component=master
                 heritage=Tiller
                 release=arracs-ghost
  Annotations:   <none>
  Capacity:      8Gi
  Access Modes:  [ReadWriteOnce]
Events:          <none>
To delete it manualy, we need to run kubectl delete pvc arracs-ghost-mariadb -n=ghost
4.4 Jobs
If we run kubectl get pod -n=kubeapps we can see some pods' STATUS are 'Completed'. For example
NAME                                                          READY   STATUS      RESTARTS   AGE
apprepo-sync-bitnami-69xst-4c2sz                              0/1     Completed   2          4m56s
apprepo-sync-incubator-n99hl-4f2hh                            0/1     Completed   2          4m56s
apprepo-sync-stable-95879-tqp4t                               0/1     Completed   2          4m56s
apprepo-sync-svc-cat-mdmhn-zgcbd                              0/1     Completed   2          4m56s
Those Pods are actually created by Jobs, refe to Jobs - Run to Completion
A job creates one or more pods and ensures that a specified number of them successfully terminate
Pick up one of the Pod in 'Completed' status, check Controlled By: Job/apprepo-sync-bitnami-69xst, it means this Pod is created by a Job.
kubectl describe pod apprepo-sync-bitnami-69xst-4c2sz  -n=kubeapps
Name:               apprepo-sync-bitnami-69xst-4c2sz
Namespace:          kubeapps
Priority:           0
PriorityClassName:  <none>
Node:               k8s-agentpool1-30506800-1/10.240.0.34
Start Time:         Tue, 25 Dec 2018 14:34:22 +0800
Labels:             apprepositories.kubeapps.com/repo-name=bitnami
                    controller-uid=1d6e98dd-080f-11e9-9002-000d3aa06791
                    job-name=apprepo-sync-bitnami-69xst
Annotations:        <none>
Status:             Succeeded
IP:                 10.240.0.81
Controlled By:      Job/apprepo-sync-bitnami-69xst
...
The system currently has below Jobs defined.
kubectl get job -n=kubeapps
NAME                           COMPLETIONS   DURATION   AGE
apprepo-sync-bitnami-69xst     1/1           2m         9m48s
apprepo-sync-incubator-n99hl   1/1           107s       9m48s
apprepo-sync-stable-95879      1/1           4m19s      9m48s
apprepo-sync-svc-cat-mdmhn     1/1           107s       9m48s