
Running a K8S Cluster in Multiple Zones on Azure with Calico and IPVS
This post will explain how to deploy a kubernetes cluster in multiple zones on Azure with detailed steps, together with enabling IPVS for high performance and Calico network policy for secure network connectivity. We will explore some concepts in multiple zones cluter and show how they work as well.


0 Background
Since 1.2, Kubernetes adds support for running a single cluster in multiple failure zones (GCE calls them simply “zones”, AWS calls them “availability zones”), while Running in Multiple Zones says
Only GCE and AWS are currently supported automatically
However there is a way to deploy multiple zones(Azure calls them "availability zones") K8S cluster in Azure if kubernetes version is 1.12 above. This feature is added into azure cloud provider recently, per article Availability Zones
With multiple-zone clusters, this spreading behavior is extended across zones (to reduce the impact of zone failures.) (This is achieved via SelectorSpreadPriority).
This post will explain how to deploy a kubernetes cluster in multiple zones on Azure with detailed steps, together with enabling IPVS for high performance and Calico network policy for secure network connectivity. We will explore some concepts in multiple zones cluter and show how they work as well.
1 Environment
The setup requires 3 VMs deployed to 3 Zones in Azure SouthEast Asia region
- k8s-01, zone 1, master node
- k8s-02, zone 2, agent node
- k8s-03, zone 3, agent node
Kubernetes cluster will be deployed with kubeadm
2 Step by Steps Guide
2.1 Deploy 3 VMs to 3 Zones in Azure SouthEast Asia Region
Copy/Paste below script and run from command prompt window, be sure to have Azure CLI installed already.
Note: To simplify the setup, I used Azure SouthEast Asia region as it supports availability zones, any other regions can also be used as long as availability zones are supported.
set SUB_ID=<replace it wth your subscription id>
set RG_NAME=<replace it with your resource group name>
set SSH_USERNAME=<replace it with your ssh username>
set SSH_PUBLIC_KEY_FILE=<replace it with your ssh public key file>

az login

az account set -s %SUB_ID%

az group create --name %RG_NAME%  --location southeastasia

az network route-table create -g %RG_NAME% -n k8s-rt

az network vnet create --resource-group %RG_NAME% --name k8s-vnet --address-prefix 172.16.0.0/16

az network nsg create --name k8s-nsg --resource-group %RG_NAME%

az network vnet subnet create -g %RG_NAME% --vnet-name k8s-vnet -n k8s-sn --address-prefix 172.16.0.0/24 --network-security-group k8s-nsg --route-table k8s-rt

az network public-ip create -g %RG_NAME% -n k8s-pip-01 --sku standard

az network nic create -g %RG_NAME% --vnet-name k8s-vnet --subnet k8s-sn -n k8s-nic-01 --ip-forwarding true --public-ip-address k8s-pip-01

az network nic create -g %RG_NAME% --vnet-name k8s-vnet --subnet k8s-sn -n k8s-nic-02 --ip-forwarding true

az network nic create -g %RG_NAME% --vnet-name k8s-vnet --subnet k8s-sn -n k8s-nic-03 --ip-forwarding true

az vm create --resource-group %RG_NAME% --name k8s-01 --image Canonical:UbuntuServer:16.04-LTS:latest --admin-username %SSH_USERNAME% --ssh-key %SSH_PUBLIC_KEY_FILE% --nics k8s-nic-01 --size Standard_B2s --zone 1

az vm create --resource-group %RG_NAME% --name k8s-02 --image Canonical:UbuntuServer:16.04-LTS:latest --admin-username %SSH_USERNAME% --ssh-key %SSH_PUBLIC_KEY_FILE% --nics k8s-nic-02 --size Standard_B2s --zone 2

az vm create --resource-group %RG_NAME% --name k8s-03 --image Canonical:UbuntuServer:16.04-LTS:latest --admin-username %SSH_USERNAME% --ssh-key %SSH_PUBLIC_KEY_FILE% --nics k8s-nic-03 --size Standard_B2s --zone 3

az network nsg rule create --resource-group %RG_NAME% --nsg-name k8s-nsg --name allow-ssh --access allow --protocol Tcp --direction Inbound --priority 200 --source-address-prefix "*" --source-port-range "*" --destination-address-prefix "*" --destination-port-range 22

az network nsg rule create --resource-group %RG_NAME% --nsg-name k8s-nsg --name allow-apiserver --access allow --protocol Tcp --direction Inbound --priority 300 --source-address-prefix "*" --source-port-range "*" --destination-address-prefix "*" --destination-port-range 6443
2.2 Install Prerequisites
To procceed kubernetes cluster setup, it requires docker, IPVS modules and kubernetes bootstrap binaries ready, here are the steps
On each VM(SSH with private key), sudo -i as root
2.2.1 Install Docker
Install docker from bash with below commands
apt-get update
apt-get install -y docker.io
2.2.2 Enable IPVS Modules
Enable IPVS modules with below commands
echo nf_conntrack_ipv4 >> /etc/modules
echo ip_vs >> /etc/modules
echo ip_vs_rr >> /etc/modules
echo ip_vs_wrr >> /etc/modules
echo ip_vs_lc >> /etc/modules
echo ip_vs_wlc >> /etc/modules
echo ip_vs_fo >> /etc/modules
echo ip_vs_ovf >> /etc/modules
echo ip_vs_lblc >> /etc/modules
echo ip_vs_lblcr >> /etc/modules
echo ip_vs_dh >> /etc/modules
echo ip_vs_sh >> /etc/modules
echo ip_vs_sed >> /etc/modules
echo ip_vs_nq >> /etc/modules
echo ip_vs_ftp >> /etc/modules
Then reboot OS, verify if IPVS is enabled by executing cut -f1 -d " " /proc/modules | grep -e ip_vs -e nf_conntrack_ipv4
If ip_vs and nf_conntrack_ipv4 are enabled, output will be similar like below
ip_vs_ftp
ip_vs_nq
ip_vs_sed
ip_vs_sh
ip_vs_dh
ip_vs_lblcr
ip_vs_lblc
ip_vs_ovf
ip_vs_fo
ip_vs_wlc
ip_vs_lc
ip_vs_wrr
ip_vs_rr
ip_vs
nf_conntrack_ipv4
Finally executing apt install ipvsadm to install ipvsadm.
2.2.3 Install Kubernetes Bootstrap Binaries
Run below commands to install kubernetes bootstrap binaries
apt-get update && apt-get install -y apt-transport-https curl
curl -s https://packages.cloud.google.com/apt/doc/apt-key.gpg | apt-key add -
cat <<EOF >/etc/apt/sources.list.d/kubernetes.list
deb http://apt.kubernetes.io/ kubernetes-xenial main
EOF
apt-get update
apt-get install -y kubelet kubeadm kubectl
3 Configure/Setup Kubernetes Cluster
3.1 Create Master Node Kubeadm Configuration File
Before run kubeadm init to create kubernetes cluster on master node, we need a configuration file, from master node k8s-01 VM, sudo -i as root, from bash, run
cat <<EOF >/etc/kubernetes/kubeadm.conf
apiVersion: kubeadm.k8s.io/v1beta1
kind: InitConfiguration
nodeRegistration:
  kubeletExtraArgs:
    cloud-provider: "azure"
    cloud-config: "/etc/kubernetes/azure.json"
---
apiVersion: kubeadm.k8s.io/v1beta1
kind: ClusterConfiguration
clusterName: k8ssea
apiServer:
  certSANs:
  - k8ssea.southeastasia.cloudapp.azure.com
  - k8ssea.k8shub.club
  - k8ssea
  - k8ssea.default
  - k8ssea.default.svc
  - k8ssea.default.svc.cluster.local
  - k8ssea.kube-system
  - k8ssea.kube-system.svc
  - k8ssea.kube-system.svc.cluster.local
  - localhost
  - 127.0.0.1
  - 10.255.255.5
  - 10.255.255.15
  - 10.0.0.1
  extraArgs:
    cloud-provider: "azure"
    cloud-config: "/etc/kubernetes/azure.json"
  extraVolumes:
  - name: cloud
    hostPath: "/etc/kubernetes/azure.json"
    mountPath: "/etc/kubernetes/azure.json"
controllerManager:
  extraArgs:
    cloud-provider: "azure"
    cloud-config: "/etc/kubernetes/azure.json"
  extraVolumes:
  - name: cloud
    hostPath: "/etc/kubernetes/azure.json"
    mountPath: "/etc/kubernetes/azure.json"
networking:
  podSubnet: 192.168.0.0/16
---
apiVersion: kubeproxy.config.k8s.io/v1alpha1
kind: KubeProxyConfiguration
mode: ipvs
EOF
It will create a configuration file at path /etc/kubernetes/kubeadm.conf.
Note: mode: ipvs tells kube-proxy to use IPVS mode, and we give this cluster a name in clusterName: k8ssea.
3.2 Create Cloud Provider Configuration File
In 3.1, /etc/kubernetes/azure.json is specified as cloud provider configuration file, to create the file, from bash, run
cat <<EOF >/etc/kubernetes/azure.json
{
    "cloud":"AzurePublicCloud",
    "tenantId": "00000000-0000-0000-0000-000000000000",
    "subscriptionId": "00000000-0000-0000-0000-000000000000",
    "aadClientId": "00000000-0000-0000-0000-000000000000",
    "aadClientSecret": "00000000-0000-0000-0000-000000000000",
    "resourceGroup": "<REPLACE_WITH_RESOURCE_GROUP_NAME>",
    "location": "southeastasia",
    "vmType": "standard",
    "subnetName": "k8s-sn",
    "securityGroupName": "k8s-nsg",
    "vnetName": "k8s-vnet",
    "vnetResourceGroup": "",
    "routeTableName": "k8s-rt",
    "cloudProviderBackoff": true,
    "cloudProviderBackoffRetries": 6,
    "cloudProviderBackoffExponent": 1.5,
    "cloudProviderBackoffDuration": 5,
    "cloudProviderBackoffJitter": 1,
    "cloudProviderRatelimit": true,
    "cloudProviderRateLimitQPS": 3,
    "cloudProviderRateLimitBucket": 10,
    "useManagedIdentityExtension": false,
    "useInstanceMetadata": true,
    "loadBalancerSku": "standard",
    "excludeMasterFromStandardLB": false
}
EOF
Note:
tenantId,subscriptionId,aadClientId,aadClientSecretandresourceGropneed to fill with the correct information.tenantIdandsubscriptionIdcan get fromaz account showaadClientIdandaadClientSecretcan create fromaz ad sp create-for-rbac --role=ContributorresourceGroupis the resource group name specified in section 2.1set RG_NAME=<replace it with your resource group name>
3.3 Init Kubernetes Cluster
From master node k8s-01 VM, sudo -i as root, run
kubeadm init --config /etc/kubernetes/kubeadm.conf to setup kubernetes cluster.
Once finished, record <TOKEN> from ouput, this token will be used to join agent node later
kubeadm join 172.16.0.4:6443 --token <TOKEN> --discovery-token-ca-cert-hash sha256:9b14f7c73f69c15a953bb9ee0cbffff779fa694240794c7c357b64c4e1b54876
3.4 Apply Calico Network Plugin/Policy
From master node, run below commands to get kubeconfig file which will be used by kubectl.
mkdir -p $HOME/.kube
sudo cp -i /etc/kubernetes/admin.conf $HOME/.kube/config
sudo chown $(id -u):$(id -g) $HOME/.kube/config
If we run kubectl get pod --all-namespace at this stage, we will find coredns-xxxxxxxxxx-xxxxx pod is in 'Pending' status, this is because we don't have network add-ons, we will install Calico as network add-ons, from bash
curl \
https://docs.projectcalico.org/v3.4/getting-started/kubernetes/installation/hosted/canal/canal.yaml \
-O
Open canal.yaml, replace 10.244.0.0/16 with 192.168.0.0/16 then save the change. From bash, run kubectl apply -f canal.yaml to install Calico.
With all steps carried out from 3.1 - 3.4, kubernetes master node should up and running now.
3.5 Create Agent Nodes Join Configuration File
From agent node k8s-02 and k8s-03 VMs, sudo -i as root, run below commands to create kubeadm join configuraiton file
cat <<EOF >/etc/kubernetes/kubeadm.conf
apiVersion: kubeadm.k8s.io/v1beta1
discovery:
  bootstrapToken:
    apiServerEndpoint: 172.16.0.4:6443
    token: <TOKEN>
    unsafeSkipCAVerification: true
  timeout: 5m0s
kind: JoinConfiguration
nodeRegistration:
  kubeletExtraArgs:
    cloud-provider: "azure"
    cloud-config: "/etc/kubernetes/azure.json"
EOF
NOTE: Be sure to replace <TOKEN> from step 3.3
3.6 Join Agent Nodes
From agent node k8s-02 and k8s-03 VMs, repeat section 3.2 steps to create cloud provider configuratio file, then sudo -i as root, run below command to join agent node
kubeadm join --config /etc/kubernetes/kubeadm.conf
3.7 Post Installation
We will use this multiple zone cluster to explain a few of concepts in section 4, before that, we need to do a small tweak so that all 3 nodes will be treated equally(no master node)
kubectl taint nodes --all node-role.kubernetes.io/master-
kubectl label nodes --all node-role.kubernetes.io/master-
By doing this, we remove master node taint/label from k8s-01.
With steps 3.1 - 3.7 carried out, we should have a kubernetes cluster running in multiple zones environment
4 Explore Multiple Zones Cluster's Feature
4.1 Node Labels
Refer to article
Both zoned and unzoned nodes are supported, but the value of node label failure-domain.beta.kubernetes.io/zone are different:
For zoned nodes, the value is <region>-<AZ>, e.g. centralus-1.
For unzoned nodes, the value is faultDomain, e.g. 0.
If we run kubectl get node --show-labels
NAME     STATUS   ROLES    AGE     VERSION   LABELS
k8s-01   Ready    master   12m     v1.13.1   beta.kubernetes.io/arch=amd64,beta.kubernetes.io/instance-type=Standard_B2s,beta.kubernetes.io/os=linux,failure-domain.beta.kubernetes.io/region=southeastasia,failure-domain.beta.kubernetes.io/zone=southeastasia-1,kubernetes.io/hostname=k8s-01
k8s-02   Ready    <none>   9m7s    v1.13.1   beta.kubernetes.io/arch=amd64,beta.kubernetes.io/instance-type=Standard_B2s,beta.kubernetes.io/os=linux,failure-domain.beta.kubernetes.io/region=southeastasia,failure-domain.beta.kubernetes.io/zone=southeastasia-2,kubernetes.io/hostname=k8s-02
k8s-03   Ready    <none>   8m17s   v1.13.1   beta.kubernetes.io/arch=amd64,beta.kubernetes.io/instance-type=Standard_B2s,beta.kubernetes.io/os=linux,failure-domain.beta.kubernetes.io/region=southeastasia,failure-domain.beta.kubernetes.io/zone=southeastasia-3,kubernetes.io/hostname=k8s-03
Those nodes should have failure-domain.beta.kubernetes.io/region and failure-domain.beta.kubernetes.io/zone labels displayed.
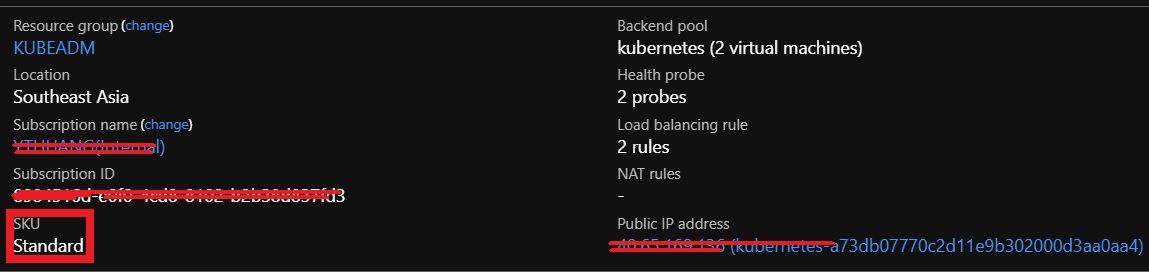
4.2 Load Balancer
Refer to Standard Load Balancer and Availability Zones
Azure Load Balancer's Standard SKU supports Availability Zones scenarios
That means in Azure, multiple zones kubernetes cluster needs to use 'Standard Load Balancer', recall in cloud provider configuration file azure.json, we set "loadBalancerSku" to "standard", that means if we create a LoadBalancer resource in our cluster, a standard load balancer will be automatically created.
For example, if we run helm install --name ni stable/nginx-ingress --set controller.replicaCount=3 to install nginx-ingress controller, we should see a standard load balancer created from Azure as well
And 3 Pods in that ReplicaSet each of them will be scheduled to a seperated node
kubectl get pod -o wide
NAME                                                READY   STATUS    RESTARTS   AGE   IP             NODE     NOMINATED NODE   READINESS GATES
ni-nginx-ingress-controller-546cd77bd8-9rwlh        1/1     Running   0          42m   192.168.0.19   k8s-01   <none>           <none>
ni-nginx-ingress-controller-546cd77bd8-dqrbv        1/1     Running   0          42m   192.168.1.12   k8s-02   <none>           <none>
ni-nginx-ingress-controller-546cd77bd8-xsb87        1/1     Running   0          42m   192.168.2.13   k8s-03   <none>           <none>
4.3 StorageClass
Refer to article
Zone-aware and topology-aware provisioning are supported for Azure managed disks. To support these features, a few options are added in AzureDisk storage class:
zoned: indicates whether new disks are provisioned with AZ. Default is true.
allowedTopologies: indicates which topologies are allowed for topology-aware provisioning. Only can be set if zoned is not false.
4.3.1 Option 'zoned' Explanation
Option zoned basically means, if it's set to false, the provisioned volume CAN NOT be attached to any nodes, even unzoned nodes. If it's set to true, the provisioned volume will be attached to nodes in same zone.
For example, if we use below StorageClass(zoned: "false")
apiVersion: storage.k8s.io/v1
kind: StorageClass
metadata:
  annotations:
    storageclass.beta.kubernetes.io/is-default-class: "true"
  labels:
    kubernetes.io/cluster-service: "true"
  name: default
parameters:
  cachingmode: None
  kind: Managed
  zoned: "false"
  storageaccounttype: Standard_LRS
provisioner: kubernetes.io/azure-disk
And provision a PersistentVolumeClaim
apiVersion: v1
kind: PersistentVolumeClaim
metadata:
  name: md
spec:
  accessModes:
  - ReadWriteOnce
  storageClassName: default
  resources:
    requests:
      storage: 2Gi
Notice "Node Affinity" is set to below, refer to Node affinity (beta feature)
If you specify multiple nodeSelectorTerms associated with nodeAffinity types, then the pod can be scheduled onto a node if one of the nodeSelectorTerms is satisfied.
If you specify multiple matchExpressions associated with nodeSelectorTerms, then the pod can be scheduled onto a node only if all matchExpressions can be satisfied.
Since no node's label will match the "Node Affinity" condition as it requires a node in all zones "0", "1" and "2", it *CAN NOT be attached to any nodes.
kubectl describe pv pvc-0a20ee9f-0c34-11e9-b302-000d3aa0aa40
Name:              pvc-0a20ee9f-0c34-11e9-b302-000d3aa0aa40
Labels:            <none>
Annotations:       pv.kubernetes.io/bound-by-controller: yes
                   pv.kubernetes.io/provisioned-by: kubernetes.io/azure-disk
                   volumehelper.VolumeDynamicallyCreatedByKey: azure-disk-dynamic-provisioner
Finalizers:        [kubernetes.io/pv-protection]
StorageClass:      default
Status:            Bound
Claim:             default/md
Reclaim Policy:    Delete
Access Modes:      RWO
VolumeMode:        Filesystem
Capacity:          2Gi
Node Affinity:
  Required Terms:
    Term 0:        failure-domain.beta.kubernetes.io/region in [southeastasia]
                   failure-domain.beta.kubernetes.io/zone in [0]
    Term 1:        failure-domain.beta.kubernetes.io/region in [southeastasia]
                   failure-domain.beta.kubernetes.io/zone in [1]
    Term 2:        failure-domain.beta.kubernetes.io/region in [southeastasia]
                   failure-domain.beta.kubernetes.io/zone in [2]
Message:
Source:
    Type:         AzureDisk (an Azure Data Disk mount on the host and bind mount to the pod)
    DiskName:     kubernetes-dynamic-pvc-0a20ee9f-0c34-11e9-b302-000d3aa0aa40
    DiskURI:      /subscriptions/8984516d-e0f0-4cd8-8102-b2b38d837fd3/resourceGroups/KUBEADM/providers/Microsoft.Compute/disks/kubernetes-dynamic-pvc-0a20ee9f-0c34-11e9-b302-000d3aa0aa40
    Kind:         Managed
    FSType:
    CachingMode:  None
    ReadOnly:     false
Events:           <none>
If we try to attach it to a Pod
kind: Pod
apiVersion: v1
metadata:
  name: busybox
spec:
  containers:
  - name: busybox
    image: busybox:latest
    resources:
      requests:
        cpu: 100m
        memory: 128Mi
      limits:
        cpu: 200m
        memory: 256Mi
    volumeMounts:
    - mountPath: "/mnt/azure"
      name: volume
  volumes:
    - name: volume
      persistentVolumeClaim:
        claimName: md
We will have below error
4s Warning FailedScheduling Pod 0/3 nodes are available: 3 node(s) had volume node affinity conflict.
If we modify StorageClass to "zoned",
apiVersion: storage.k8s.io/v1
kind: StorageClass
metadata:
  annotations:
    storageclass.beta.kubernetes.io/is-default-class: "true"
  labels:
    kubernetes.io/cluster-service: "true"
  name: default
parameters:
  cachingmode: None
  kind: Managed
  zoned: "true"
  storageaccounttype: Standard_LRS
provisioner: kubernetes.io/azure-disk
Then the provisioned volume will be below and it can be attached to node in zone 1
kubectl describe pv pvc-6b8d1e52-0c45-11e9-b302-000d3aa0aa40
Name:              pvc-6b8d1e52-0c45-11e9-b302-000d3aa0aa40
Labels:            failure-domain.beta.kubernetes.io/region=southeastasia
                   failure-domain.beta.kubernetes.io/zone=southeastasia-1
Annotations:       pv.kubernetes.io/bound-by-controller: yes
                   pv.kubernetes.io/provisioned-by: kubernetes.io/azure-disk
                   volumehelper.VolumeDynamicallyCreatedByKey: azure-disk-dynamic-provisioner
Finalizers:        [kubernetes.io/pv-protection]
StorageClass:      default
Status:            Bound
Claim:             default/md
Reclaim Policy:    Delete
Access Modes:      RWO
VolumeMode:        Filesystem
Capacity:          2Gi
Node Affinity:
  Required Terms:
    Term 0:        failure-domain.beta.kubernetes.io/region in [southeastasia]
                   failure-domain.beta.kubernetes.io/zone in [southeastasia-1]
Message:
Source:
    Type:         AzureDisk (an Azure Data Disk mount on the host and bind mount to the pod)
    DiskName:     kubernetes-dynamic-pvc-6b8d1e52-0c45-11e9-b302-000d3aa0aa40
    DiskURI:      /subscriptions/8984516d-e0f0-4cd8-8102-b2b38d837fd3/resourceGroups/KUBEADM/providers/Microsoft.Compute/disks/kubernetes-dynamic-pvc-6b8d1e52-0c45-11e9-b302-000d3aa0aa40
    Kind:         Managed
    FSType:
    CachingMode:  None
    ReadOnly:     false
Events:           <none>
4.3.2 Option 'allowedTopologies' Explanation
allowedTopologies basically ask Azure cloud provider to provision the disk in requested zone(configured in values). For example, if you use a StorageClass like below
apiVersion: storage.k8s.io/v1
kind: StorageClass
metadata:
  annotations:
    storageclass.beta.kubernetes.io/is-default-class: "true"
  labels:
    kubernetes.io/cluster-service: "true"
  name: default
parameters:
  cachingmode: None
  kind: Managed
  zoned: "true"
  storageaccounttype: Standard_LRS
provisioner: kubernetes.io/azure-disk
allowedTopologies:
- matchLabelExpressions:
  - key: failure-domain.beta.kubernetes.io/zone
    values:
    - southeastasia-1
    - southeastasia-2
Azure will only provision disks in zone "southeastasia-1" and "southeastasia-2".
5 Explore IPVS
From IPVS article
IPVS (IP Virtual Server) implements transport-layer load balancing, usually called Layer 4 LAN switching, as part of Linux kernel.
IPVS runs on a host and acts as a load balancer in front of a cluster of real servers. IPVS can direct requests for TCP and UDP-based services to the real servers, and make services of real servers appear as virtual services on a single IP address.
When IPVS is enabled, from any nodes, running ipvsadm -ln will show address mapping like below
ipvsadm -ln
IP Virtual Server version 1.2.1 (size=4096)
Prot LocalAddress:Port Scheduler Flags
  -> RemoteAddress:Port           Forward Weight ActiveConn InActConn
TCP  10.96.0.1:443 rr
  -> 172.16.0.4:6443              Masq    1      4          0
TCP  10.96.0.10:53 rr
  -> 192.168.0.17:53              Masq    1      0          0
  -> 192.168.0.18:53              Masq    1      0          0
TCP  10.106.42.178:44134 rr
  -> 192.168.1.5:44134            Masq    1      0          0
UDP  10.96.0.10:53 rr
  -> 192.168.0.17:53              Masq    1      0          0
  -> 192.168.0.18:53              Masq    1      0          0
IPVS proxier will employ iptables in doing packet filtering, SNAT or masquerade.
Executeiptables-savewill show some of kubernetes iptables rules are still left
iptables-save|grep KUBE
:KUBE-FIREWALL - [0:0]
:KUBE-LOAD-BALANCER - [0:0]
:KUBE-MARK-DROP - [0:0]
:KUBE-MARK-MASQ - [0:0]
:KUBE-NODE-PORT - [0:0]
:KUBE-POSTROUTING - [0:0]
:KUBE-SERVICES - [0:0]
-A PREROUTING -m comment --comment "kubernetes service portals" -j KUBE-SERVICES
-A OUTPUT -m comment --comment "kubernetes service portals" -j KUBE-SERVICES
-A POSTROUTING -m comment --comment "kubernetes postrouting rules" -j KUBE-POSTROUTING
-A KUBE-FIREWALL -j KUBE-MARK-DROP
-A KUBE-LOAD-BALANCER -j KUBE-MARK-MASQ
-A KUBE-MARK-DROP -j MARK --set-xmark 0x8000/0x8000
-A KUBE-MARK-MASQ -j MARK --set-xmark 0x4000/0x4000
-A KUBE-POSTROUTING -m comment --comment "kubernetes service traffic requiring SNAT" -m mark --mark 0x4000/0x4000 -j MASQUERADE
-A KUBE-POSTROUTING -m comment --comment "Kubernetes endpoints dst ip:port, source ip for solving hairpin purpose" -m set --match-set KUBE-LOOP-BACK dst,dst,src -j MASQUERADE
-A KUBE-SERVICES ! -s 192.168.0.0/16 -m comment --comment "Kubernetes service cluster ip + port for masquerade purpose" -m set --match-set KUBE-CLUSTER-IP dst,dst -j KUBE-MARK-MASQ
-A KUBE-SERVICES -m addrtype --dst-type LOCAL -j KUBE-NODE-PORT
-A KUBE-SERVICES -m set --match-set KUBE-CLUSTER-IP dst,dst -j ACCEPT
:KUBE-FIREWALL - [0:0]
:KUBE-FORWARD - [0:0]
-A INPUT -j KUBE-FIREWALL
-A FORWARD -m comment --comment "kubernetes forwarding rules" -j KUBE-FORWARD
-A OUTPUT -j KUBE-FIREWALL
-A KUBE-FIREWALL -m comment --comment "kubernetes firewall for dropping marked packets" -m mark --mark 0x8000/0x8000 -j DROP
-A KUBE-FORWARD -m comment --comment "kubernetes forwarding rules" -m mark --mark 0x4000/0x4000 -j ACCEPT
-A KUBE-FORWARD -s 192.168.0.0/16 -m comment --comment "kubernetes forwarding conntrack pod source rule" -m conntrack --ctstate RELATED,ESTABLISHED -j ACCEPT
-A KUBE-FORWARD -d 192.168.0.0/16 -m comment --comment "kubernetes forwarding conntrack pod destination rule" -m conntrack --ctstate RELATED,ESTABLISHED -j ACCEPT
Specifically, ipvs proxier will use ipset to store source or destination address of traffics that need DROP or do masquerade, to make sure the number of iptables rules be constant, no metter how many services we have.
Execute ipset list will list all ipset sets that kubernetes IPVS used
apt install ipset
...
ipset list
Name: KUBE-LOOP-BACK
Type: hash:ip,port,ip
Revision: 5
Header: family inet hashsize 1024 maxelem 65536
Size in memory: 416
References: 1
Number of entries: 4
Members:
192.168.0.18,udp:53,192.168.0.18
192.168.0.18,tcp:53,192.168.0.18
192.168.0.17,tcp:53,192.168.0.17
192.168.0.17,udp:53,192.168.0.17

Name: KUBE-LOAD-BALANCER-SOURCE-IP
Type: hash:ip,port,ip
Revision: 5
Header: family inet hashsize 1024 maxelem 65536
Size in memory: 96
References: 0
Number of entries: 0
Members:

Name: KUBE-NODE-PORT-LOCAL-TCP
Type: bitmap:port
Revision: 3
Header: range 0-65535
Size in memory: 8268
References: 0
Number of entries: 0
Members:

Name: KUBE-NODE-PORT-LOCAL-UDP
Type: bitmap:port
Revision: 3
Header: range 0-65535
Size in memory: 8268
References: 0
Number of entries: 0
Members:

Name: KUBE-NODE-PORT-SCTP
Type: bitmap:port
Revision: 3
Header: range 0-65535
Size in memory: 8268
References: 0
Number of entries: 0
Members:

Name: KUBE-LOAD-BALANCER
Type: hash:ip,port
Revision: 5
Header: family inet hashsize 1024 maxelem 65536
Size in memory: 88
References: 0
Number of entries: 0
Members:

Name: KUBE-LOAD-BALANCER-LOCAL
Type: hash:ip,port
Revision: 5
Header: family inet hashsize 1024 maxelem 65536
Size in memory: 88
References: 0
Number of entries: 0
Members:

Name: KUBE-LOAD-BALANCER-SOURCE-CIDR
Type: hash:ip,port,net
Revision: 7
Header: family inet hashsize 1024 maxelem 65536
Size in memory: 352
References: 0
Number of entries: 0
Members:

Name: KUBE-NODE-PORT-TCP
Type: bitmap:port
Revision: 3
Header: range 0-65535
Size in memory: 8268
References: 0
Number of entries: 0
Members:

Name: KUBE-NODE-PORT-UDP
Type: bitmap:port
Revision: 3
Header: range 0-65535
Size in memory: 8268
References: 0
Number of entries: 0
Members:

Name: KUBE-CLUSTER-IP
Type: hash:ip,port
Revision: 5
Header: family inet hashsize 1024 maxelem 65536
Size in memory: 344
References: 2
Number of entries: 4
Members:
10.96.0.1,tcp:443
10.96.0.10,udp:53
10.106.42.178,tcp:44134
10.96.0.10,tcp:53

Name: KUBE-EXTERNAL-IP
Type: hash:ip,port
Revision: 5
Header: family inet hashsize 1024 maxelem 65536
Size in memory: 88
References: 0
Number of entries: 0
Members:

Name: KUBE-LOAD-BALANCER-FW
Type: hash:ip,port
Revision: 5
Header: family inet hashsize 1024 maxelem 65536
Size in memory: 88
References: 0
Number of entries: 0
Members:

Name: KUBE-NODE-PORT-LOCAL-SCTP
Type: bitmap:port
Revision: 3
Header: range 0-65535
Size in memory: 8268
References: 0
Number of entries: 0
Members: